Apache Spark is a super fast distributed computing framework for big data analytics. Tests of Spark show that it’s anywhere from 10 to 100 times faster than Hadoop’s Map Reduce processing framework. Because of this, it’s become one of the hottest technologies in data science.
In this tutorial, I’ll show you how to set up a Spark cluster with Amazon’s Elastic Map Reduce (EMR) service and use it to do some analysis. Running on Amazon will allow us to get a cluster up and running super quick because all of the ops and configuration work will be handled for us.
We’ll do the same task we’ve done in other tutorials – namely figuring out which baseball player has the highest ever annual salary. Of course, this is a trivial task for Spark – the analysis can be done quickly and easily on a laptop using R. However, working with the baseball data has a few benefits:
- We don’t need to spend time learning about new data sets since we already know the baseball data and analysis plan from other tutorials
- The structure of the data and type of analysis (namely, data in tables requiring a merge and then a calculation) is very common procedure and easy to understand
And…we’ll actually be working in a cluster environment, so what we’ll learn will easily translate to working with larger data sets.
Ok let’s get started.
First, if you haven’t already done so, go through our Get Started with AWS in 20 Minutes tutorial to set up an AWS account and learn how to remotely access an EC2 instance. Please note, since Spark runs on a large computing cluster, we won’t be able to stay in the AWS free tier for this tutorial. However, if you set up the EMF cluster for the analysis and then terminate it after you finish, charges should be minimal (as a point of reference, from my bill, it looks like the cluster running EMR with 3 m1.medium EC2 instances costs less than $0.35 per hour (plus a negligible cost for attached storage).
Spin Up an EMR Hadoop Cluster with Spark
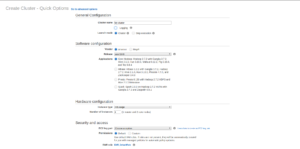
Log in to your AWS console. Go to Services>All AWS Services>EMR. Click the blue “Create Cluster” button and you should come to screen like this:

Give your cluster a name. Under “Applications” choose “Spark”. For “Instance Type” choose m1.medium. For “EC2 key pair” choose the key pair you created in the Get Started with AWS tutorial. If there is a default setting for “Logging” you can leave it as is or uncheck it. Leave the rest of the settings as is.
Now click the blue “Launch Cluster” button.
You should now see a screen showing that the cluster is starting and that “Master” and “Core” nodes are “Provisioning” or “Bootstrapping”. Wait until both “Master” and “Core” say “Running”. (Note: if it seems to be taking too long, click on “Cluster List” on the left (sometimes the cluster overview page doesn’t update automatically. If your cluster’s “Status” says “Waiting Cluster Ready”, you are good to go).
Distributed computing clusters are organized into nodes. Our cluster has three nodes, one of which is called the master. You’ll need to SSH into the master node to run Spark. But to do this, you need to make sure the security settings on the master node are set to allow an SSH connection from your computer.
Look under “Security and Access” on the “Cluster List” and click on the blue hyperlink for “Security group for Master”. Now click the button on the left next to the item that has a “Group Name” of ElasticMapReduce-master. Now at the bottom click on the “Inbound” tab. Make sure your external IP address shows up as a “Source” for one of the SSH items. If you don’t know your external IP address, search for “whats my ip” in google and it should come up. If your external IP address is not listed as a “Source” for one of the SSH items, click “Edit” then “Add Rule” then choose SSH for “Type”, “Port” should auto-populate to 22, then choose “My IP” for “Source”. Then save the change.
Connect to Master Node EC2 Instance
Follow the instructions in Get Started with AWS in 20 Minutes to connect to your cluster’s master node EC2 instance. The process is exactly the same except:
- Instead of “ubuntu@your-instance-public-dns-address“, use “hadoop@your-instance-public-dns-address”
- In number (1) above, “your-instance-public-dns-address” should be the “Master public DNS” listed in the Cluster details on AWS
- You don’t have to prep the key pair with chmod or PuTTygen because you’re using the one you already prepped in the other tutorial
Now you should see a prompt in your terminal that looks like:
[hadoop@ip-address ~]$
Congratulations, you’ve successfully spun up your first Hadoop cluster with Spark and connect to the master node with ssh.
Copy CSV Files to AWS S3
Amazon provides an object storage system called S3. We’ll put our two CSV files (Salaries.csv and Master.csv) there and then access them directly through Spark.
Go to the AWS web console. Then click on “Services” then on S3. Now click on the blue “Create Bucket” button. Enter a name for your bucket (you’ll have to use a unique name because each bucket name can only be used once across all of AWS S3). Leave the default region then click the blue “Create” button.
Now click on your bucket to open it. Then click the blue “Upload” button. Then click “Add Files”. Browse to select the “Master.csv” and “Salaries.csv” files and then click “Open”. Now wait for the files to upload.
Open PySpark Interactive Shell
Spark comes with support for a Scala shell (Scala is the language Spark is written in) and a Python shell. We’ll use the Python shell for this tutorial. To run the Python shell, issue this command (remember, don’t retype the prompt, just type pyspark):
[hadoop@ip-address ~]$ pyspark
Awesome. You should see a screen that displays Spark version 2.0.0 and then a prompt that looks like:
>>>
Create Data Frames from the CSV Files
The first thing we’ll do in PySpark is create data frames from the CSV files. The command for reading in a csv file in PySpark is spark.read.csv(). To import the Salaries.csv file, issue the following command (note, if you copy and paste the text you may get a SyntaxError because of the styling of the quotes – if this happens, just delete the quotes and type them directly into the terminal window):
>>> salariesdf = spark.read.csv(‘s3n://your-s3-bucket-name/Salaries.csv’, header = ‘true’)
To make sure we have the data ingested properly, issue the following commands:
>>> salariesdf
This should output:
DataFrame[yearID: string, teamID: string, lgID: string, playerID: string, salary: string]
Now let’s look at a sample of the data:
>>> salariesdf.take(3)
This should output 3 rows of data:
[Row(yearID=u’1985′, teamID=u’ATL’, lgID=u’NL’, playerID=u’barkele01′, salary=u’870000′), Row(yearID=u’1985′, teamID=u’ATL’, lgID=u’NL’, playerID=u’bedrost01′, salary=u’550000′), Row(yearID=u’1985′, teamID=u’ATL’, lgID=u’NL’, playerID=u’benedbr01′, salary=u’545000′)]
Great. Now let’s import the Master.csv file:
>>> masterdf = spark.read.csv(‘s3n://your-s3-bucket-name/Master.csv’, header = ‘true’)
Congratulations, you’ve just imported CSV files to create Spark Data Frames!
Use Spark SQL to Join and Pull Data
The read.csv() command we just used is available through a PySpark module called Spark SQL that can be used to create and work with data frames and to use sql syntax to work with Spark data frames.
We’ll now create tables from the two CSV files, then we’ll merge the tables and pull the observations with the highest salary, as we’ve done in other tutorials.
First, let’s create the tables. Issue the following commands:
>>> salariesdf.createOrReplaceTempView(‘salariestable’)
>>> masterdf.createOrReplaceTempView(‘mastertable’)
Now, let’s use SQL to merge the two tables and pull the observation(s) with the highest salary (if you’ve gone through the Get Started with PostgreSQL in 20 Minutes tutorial, this syntax should look familiar):
>>> highestsalary = spark.sql(‘SELECT mastertable.nameFirst, mastertable.nameLast, salariestable.yearID, salariestable.salary FROM mastertable, salariestable WHERE mastertable.playerID = salariestable.playerID and salariestable.salary = 33000000’)
Now, let’s look at the highestsalary data frame:
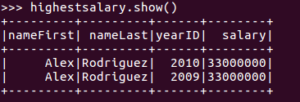
>>> highestsalary.show()
You should see output that looks like this:

Congratulations, you’ve successfully done your first data analysis using Spark.
Please remember to log back into your AWS account and terminate your EMR cluster. From the AWS console, click on “Services” then “EMR” then click on your cluster name. Then click the “Terminate” button. Then click the red “Terminate” button in the pop-up window. If you don’t do this, the EMR cluster and the 3 underlying EC2 instances will keep running indefinitely and will accrue very large charges on your AWS account.
Continue to our next tutorial: Get Started with Apache Hive in 20 Minutes.

