Amazon Web Services (AWS) is a robust set of cloud computing services that Amazon makes available for use on-demand. With AWS, we can do things as simple as commissioning a cheap, lightweight server running Ubuntu for simple processing to commissioning a large distributed cluster of machines running Hadoop.
In this tutorial, I’ll show you how to commission a lightweight Ubuntu instance through AWS’s EC2 (Elastic Compute Cloud) service and then connect to the instance using your computer. I’ll also show you how to copy files from your computer to your instance.
First, let’s download the following files which we’ll put onto the instance:
Download Sean Lahman’s Baseball Database (a set of historical baseball datasets). Get the 2015 — comma-delimited version here: http://www.seanlahman.com/baseball-archive/statistics/).
Now go to your Downloads folder and double click on the “baseballdatabank-master_2016-03-02” folder and click to Extract it. Now double click on the “baseballdatabank-master” folder then on the “core” folder. Then find the “Salaries.csv” and “Master.csv” files and copy them back into the Downloads folder (we want those two files in the Downloads folder because it will be easier to access them when we go to copy them to the EC2 instance).
So now if you go into your Downloads folder you should see any files you’ve downloaded from the internet including the baseballdatabank-master zip file, the extracted baseballdatabank-master folder and the Salaries.csv and Master.csv files.
Create AWS Account and Commission EC2 Instance
The next step is to create an AWS account. If you don’t already have one, you’ll qualify for a free year of the service – the free tier is limited to certain services, but this tutorial will stay within AWS’s free tier.
To create your AWS account, go here: https://aws.amazon.com/. Once you create your account, login to it (unless you are already logged in after subscribing). Click on “Services” at the top and you should see a screen that looks like this:
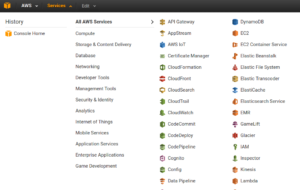
Click on “Compute” and you should see a screen that looks like this:
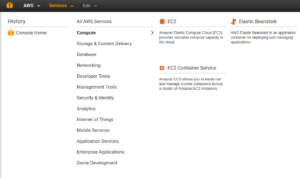
Click on EC2, then click on the blue button that says “Launch Instance”. This will bring you to a screen asking you to choose an Amazon Machine Instance (AMI):
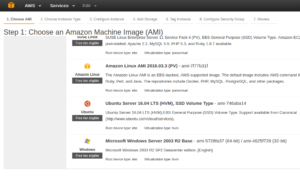
Scroll down to find “Ubuntu Server 16.04 LTS (HVM), SSD Volume Type” and click the blue “Select” button. You should see a flag under the Ubuntu icon saying “Free tier eligible” – this is how you’ll know you are staying within AWS’s free tier.
Now you should see a screen asking you to choose an Instance Type:
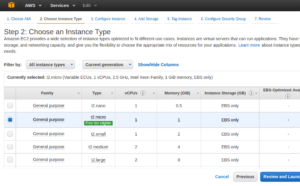
Choose “t2.micro” and then click “Next: Configure Instance Details”. Then click “Next: Add Storage” without making any changes, then click “Next: Tag Instance” without making any changes, then click “Next: Configure Security Group” without making any changes. This will bring you to a screen asking you to set Security Groups for your instance. This allows you to limit access your instance:

We’ll keep the SSH security group – this will allow you to connect to your EC2 instance remotely. Change the source to “My IP” – you should see your public IP address auto-populate. This creates a firewall rule for your EC2 instance that will allow connections only from SSH sessions coming from your public IP address. If your public IP address changes (for instance, because you go to Starbucks or because your ISP changes it) you will have to change the security group settings to accept your new IP address.
Ok, now click the blue “Review and Launch” button. You’ll now see a screen with the overview of the instance you requested. Click the blue “Launch” button.
You’ll now see a pop-up window about key pairs – asking you to select an existing one or to create a new one. Select “Create a new key pair”. Then type a name for it (name it anything you want). Then click “Download Key Pair”. This will download a key pair (with file extension .pem) onto your computer (it should download to your Downloads folder). Now click the blue “Launch Instance” button.
Now scroll down and click the blue “View Instance” button. Then next screen will show your EC2 instance and under the “Status Checks” column will likely display “Initializing”. You’ll have to wait until it finishes initializing to take the next steps.
After the instance initializes, you should see some information about it in the bottom section of the screen. Find the instance’s Public DNS and write it down.
Connect to Your EC2 Instance (Instructions for Mac and Linux)
Now open a terminal window (CTRL+ALT+T) if on Linux or (CRTL+Option+Shift+T) if on a Mac:
Type the following into the terminal command line:
$ cd Downloads
$ chmod 400 name-of-your-key-pair-file.pem
$ ssh -i name-of-your-key-pair-file.pem ubuntu@your-instance-public-dns-address
You may see a warning that the authenticity of the host can’t be established and asking if you want to continue. This is happening because it’s the first time you are using ssh to access the server. You should not see this warning anytime you access this server after this first time (if you do, you may have a security problem). Go ahead and type “yes” to continue.
You should now see a prompt that looks like:
ubuntu@ip-address:~$
Great, you’re now connect to your EC2 instance. Any commands you type into this terminal will be run on your instance.
Copy Two CSV Files to Your Instance (Instructions for Mac and Linux)
To copy your CSV files from your computer to the EC2 instance, we’ll use “scp” (secure copy). First, open a new terminal window (CTRL+ALT+T) and make sure the prompt shows your computer (not the EC2 instance) and make sure you are in the Downloads folder (if not, issue the command: $ cd Downloads) since that’s where we put the CSV files we want to copy. Now, here’s the command:
$ scp -i name-of-your-key-pair-file.pem Salaries.csv ubuntu@your-instance-public-DNS-address:Salaries.csv
After the file copies, you should see Salaries.csv written in the terminal window with some other information. Great, now go back to the terminal with the “ubuntu” name in the command line and type:
$ ls
You should now see the Salaries.csv file (note “ls” is the command to show the contents of the current folder – so this will show you that the file is actually on the EC2 instance).
Ok, now let’s copy over the “Master.csv” file (remember to issue the command in the terminal with the Downloads folder of your computer, not the EC2 “ubuntu” command line):
$ scp -i name-of-your-key-pair-file.pem Master.csv ubuntu@your-instance-public-DNS-address:Master.csv
Now check to make sure the “Master.csv” file is on the EC2 instance using “ls” just like we did for the “Salaries.csv” file.
Now go to the terminal for your computer (not the EC2 “ubuntu” terminal) and type “exit” to close the window.
Congratulations! You’ve just created your first AWS EC2 instance, used SSH to connect to it, and copied two files to it from your computer.
From here you can continue to our Get Started with PostgreSQL in 20 Minutes tutorial if you like. If not, you need to terminate the EC2 instance on AWS. Log back into your AWS account, click on “Instances” then go to “Actions>Instance State>Terminate” to terminate your EC2 instance. If you don’t do this, the EC2 instance will keep running indefinitely and will eventually start to accrue charges to your account.
Connect to Your EC2 Instance (Instructions for Windows)
For Windows, you’ll need to download an SSH client called PuTTy. You’ll need PuTTY, PSCP, and PuTTYgen and will have to download them separately. You can get them all here: http://www.chiark.greenend.org.uk/~sgtatham/putty/download.html.
Now, open PuTTygen. You should see a screen like this:
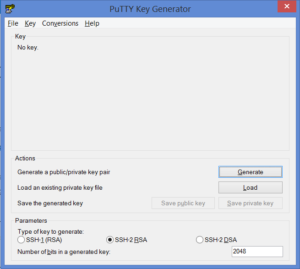
Click “Load”. You should now see a pop-up screen asking you to find a private key file to load. Navigate to the .pem file you downloaded when you created a key pair using AWS (it should be in your Downloads folder). Note that by default the pop-up will only show .ppk files while the file you downloaded will be a .pem file, so you’ll have to change the drop-down box after “File name” to “All files (*.*). Ok, highlight your .pem file then click “Open”. Now click “Save private key”. Click “Yes” to save it without a passphrase to protect it. Now choose a name for your file and click “Save” (it will default to saving the file as type .ppk – do not change this).
Great, now open PuTTy (remember, we were working with PuTTygen before). You should see a screen like this:
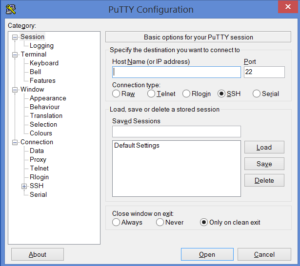
For Host Name, enter ubuntu@your-instance-public-dns-address
Make sure Port is set to 22 and Connection type is SSH.
Now expand the SSH menu on the left and click on Auth. On the right you will see a space that says “Private key file for authentication”. Click “Browse” then select your .ppk file and then click “Open”. You should now see a black terminal window pop-up and connect to your instance. You should see a prompt that looks like this:
ubuntu@ip-address:~$
Great, you’re now connect to your EC2 instance. Any commands you type into this terminal will be run on your instance.
Copy Two CSV Files to Your Instance (Instructions for Windows)
Open a command line window by going to your Start Menu, selecting “Run” then typing cmd and clicking “Ok”. You should now see a terminal window with the following prompt:
C:\Users\your-username>
Since everything we need to use is located in the Downloads folder, go to that folder:
> cd Downloads
Now, here’s the command to copy the Salaries.csv file (enter it all as one line):
> pscp -i name-of-your-key-pair-file.ppk Salaries.csv ubuntu@your-instance-public-DNS-address:Salaries.csv
After the file copies, you should see Salaries.csv written in the terminal window with some other information. Great, now go back to the terminal with the “ubuntu” name in the command line and type:
$ ls
You should now see the Salaries.csv file (note “ls” is the command to show the contents of the current folder – so this will show you that the file is actually on the EC2 instance).
Ok, let’s now copy over the “Master.csv” file (remember to issue the command in the terminal with the Downloads folder of your computer, not the EC2 “ubuntu” command line):
> pscp -i name-of-your-key-pair-file.ppk Master.csv ubuntu@your-instance-public-DNS-address:Master.csv
Now check to make sure the “Master.csv” file is on the EC2 instance using “ls” just like we did for the “Salaries.csv” file.
Now go to the terminal for your computer (not the EC2 “ubuntu” terminal) and type exit to close the window.
Congratulations! You’ve just created your first AWS EC2 instance, used SSH to connect to it, and copied two files to it from your computer.
From here you can continue to our Get Started with PostgreSQL in 20 Minutes tutorial if you like. If not, you need to terminate the EC2 instance on AWS. Log back into your AWS account, click on “Instances” then go to “Actions>Instance State>Terminate” to terminate your EC2 instance. If you don’t do this, the EC2 instance will keep running indefinitely and will eventually start to accrue charges to your account.

